

Telescope
Knowledge Ark build sheet · history · how it works · parts · step-by-step build · safety
The telescope, opened up
A small refracting telescope drawn in cutaway. Light enters at the front, is brought to a focus inside the tube, and is magnified by the eyepiece at the back.
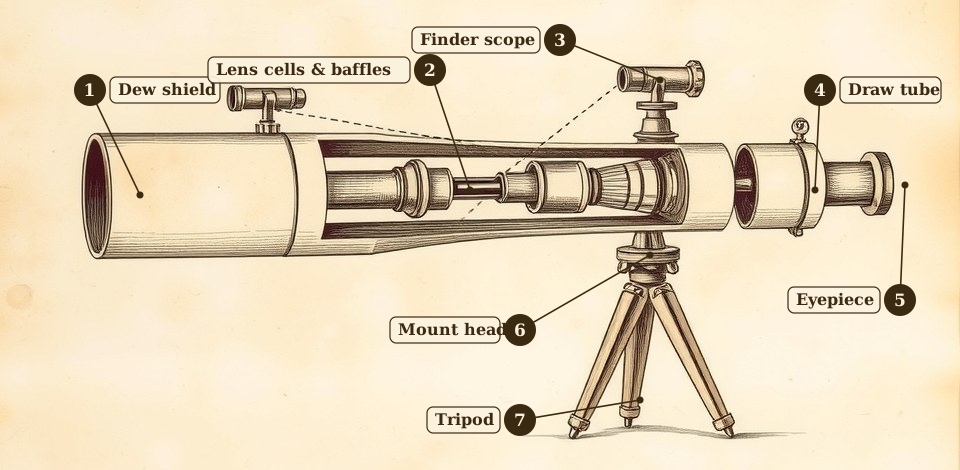
- 1Front of the main tube and dew shield: keeps stray light and dew off the objective lens, which sits just inside.
- 2Inside the tube: lens cells and blackened baffle rings hold the optics square and stop reflections from washing out the image.
- 3Finder scope: a small low-power sight lined up with the main telescope so you can aim it.
- 4Draw tube (focuser): slides in and out to put the eyepiece exactly where the image forms.
- 5Eyepiece: the small lens you look through; it magnifies the image the objective makes.
- 6Mount head: lets the telescope tilt and turn smoothly and lock in place.
- 7Tripod: a steady base matters as much as good glass, because any shake is magnified too.
Illustration: AI-assisted drawing for the Knowledge Ark, parts shown approximately. The diagrams below give the exact light path and parts layout.
Knowledge Ark build sheet · Knowledge Ark · Culture Ark · An Artificial Mind Hive project by Austin Little
A telescope is one of the simplest machines that changed what people know. Two pieces of shaped glass, held the right distance apart in a tube, let a person see mountains on the Moon, moons around Jupiter and stars too faint for the naked eye. This sheet explains where the telescope came from, how it evolved, how it works, what each part does, and how to build a working one from two lenses and a cardboard tube. Everything here is meant to be rebuilt from scratch if it ever had to be.
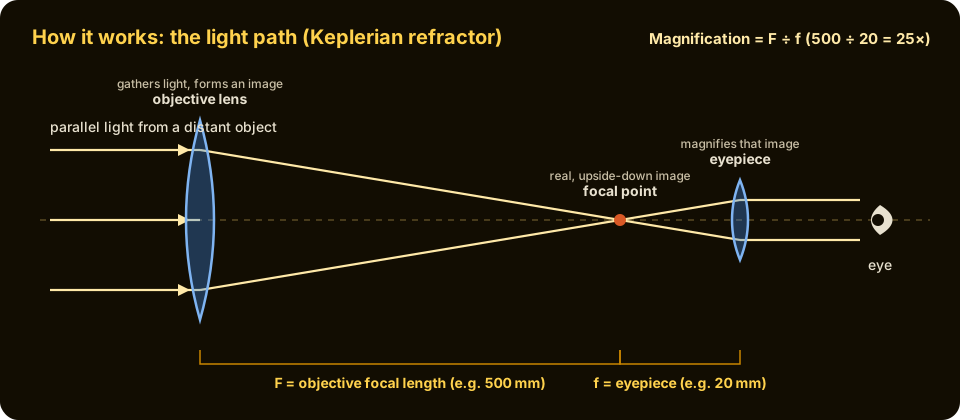
The light path. The big front lens gathers light and forms a small upside-down image at its focal point; the eyepiece behaves like a magnifying glass for that image. Magnification is the objective's focal length divided by the eyepiece's.
Why keep this in the Knowledge Ark
A telescope teaches several things at once. It shows how lenses bend light, how focal length decides magnification, why bigger glass gathers more light, and why a careful measurement beats a guess. It is also practical: a small telescope helps with navigation, surveying, watching distant weather, reading signals and keeping watch over land or water. And it is one of the clearest examples in history of a tool changing ideas. The first telescopic views of the sky helped overturn the belief that everything in the heavens circled the Earth.
History: how it came about
Before the telescope
People had known for a long time that curved glass and water-filled globes could magnify. Reading stones, polished lens-shaped pieces of glass or crystal laid on a page, were in use in medieval Europe, and spectacles for long-sightedness appeared in Italy around the end of the thirteenth century. Lens grinders in the Netherlands, Italy and elsewhere became skilled at making convex lenses for reading glasses and, later, concave lenses for short-sighted people. The telescope was waiting inside that trade: someone only had to hold two of these lenses in line, at the right distance, and look through both.
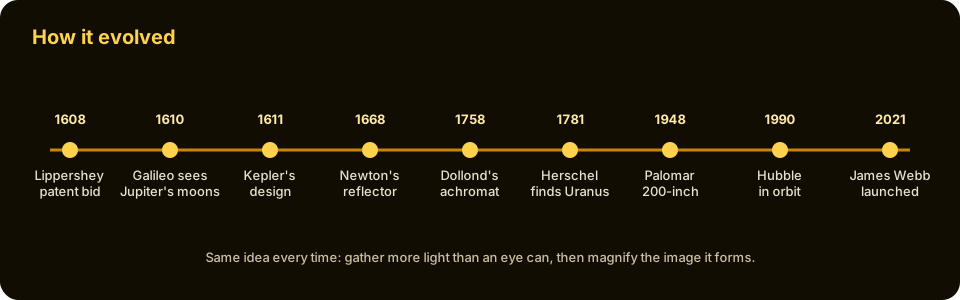
1608: the first recorded telescope
The earliest firm record comes from the Netherlands. In late September or early October 1608, Hans Lippershey, a spectacle maker in Middelburg, asked the States General of the Dutch Republic for a patent on a device "for seeing things far away as if they were nearby". Within weeks two other men, Jacob Metius of Alkmaar and Sacharias Janssen of Middelburg, were also connected with the same invention. Because several people had it almost at once, the patent was refused, but the government paid Lippershey to make binocular versions for the army. News spread quickly through Europe, and simple "Dutch perspective glasses" of about three times magnification were soon being sold in Paris, Venice and London.
1609–1610: Galileo turns it to the sky
The Italian mathematician Galileo Galilei heard of the Dutch device in 1609 and worked out how to make a better one himself. He ground his own lenses, using a convex lens at the front and a concave lens as the eyepiece, a layout now called the Galilean telescope. His instruments reached around twenty times magnification. In late 1609 and January 1610 he pointed them upward and saw what no one had recorded before: mountains and craters on the Moon, countless stars in the Milky Way, and four small moons circling Jupiter. He published these findings in March 1610 in a short book, Sidereus Nuncius (The Starry Messenger). Moons orbiting another planet were strong evidence that not everything in the sky went around the Earth, and the telescope became part of the great argument over the Sun-centred model of the solar system.
1611: Kepler's better design
In 1611 the German astronomer Johannes Kepler explained in his book Dioptrice how lenses form images, and proposed a different layout: two convex lenses instead of one convex and one concave. The Keplerian telescope shows the image upside down, which matters little for looking at stars, but it gives a much wider field of view and allows higher magnification. Almost every astronomical refracting telescope since has followed Kepler's layout, including the one built later on this sheet.
Longer and longer tubes
Early lenses had two flaws. Their curved surfaces did not bring all light to exactly one point (spherical aberration), and glass bends each colour by a slightly different amount, so stars showed coloured fringes (chromatic aberration). Seventeenth-century astronomers found that very long focal lengths reduced both problems. Telescopes grew to remarkable lengths; some "aerial telescopes" had no tube at all, just an objective lens on a tall pole and an eyepiece held by the observer dozens of metres away. With such instruments Christiaan Huygens discovered Saturn's moon Titan in 1655 and recognised that Saturn has a ring.
1668: Newton's reflector
Isaac Newton concluded, wrongly as it turned out, that colour fringing could never be removed from lenses. So in 1668 he built a telescope that used a curved mirror instead of a front lens, because a mirror reflects all colours the same way. A small flat mirror near the top of the tube sent the image out to an eyepiece on the side. He presented an improved version to the Royal Society in London in 1671–72. The Newtonian reflector is still one of the most popular designs for amateur astronomers, because a mirror can be made larger and cheaper than a lens of the same size.
1758: colour-free lenses
In the 1730s Chester Moor Hall in England found that pairing a convex lens of crown glass with a concave lens of flint glass could cancel most of the colour fringing. The London optician John Dollond developed and patented the achromatic lens in 1758, and it made shorter, sharper refracting telescopes possible. Most good small refractors still use an achromatic "doublet" objective.
Bigger mirrors, deeper sky
William Herschel built large reflecting telescopes with metal mirrors he cast and polished himself, and in 1781 discovered the planet Uranus, the first planet found with a telescope. In the nineteenth century, silver-coated glass mirrors replaced heavy metal ones. Refractors reached their practical limit with the 40-inch lens of the Yerkes Observatory in Wisconsin in 1897; a lens larger than that sags under its own weight. After that, mirrors took over: the 100-inch Hooker telescope on Mount Wilson, used by Edwin Hubble in the 1920s to show that other galaxies exist and that the universe is expanding, and the 200-inch Hale telescope at Palomar, completed in 1948.
Telescopes in space and beyond light
The air blurs and blocks starlight, so the next step was to leave it. The Hubble Space Telescope was launched in 1990 and, after a repair mission fixed its flawed mirror in 1993, produced some of the sharpest images ever taken of deep space. The James Webb Space Telescope, launched on 25 December 2021, uses a segmented gold-coated mirror 6.5 metres across to see in infrared light, looking back at some of the earliest galaxies. Radio telescopes, X-ray telescopes and gravitational-wave detectors extend the same idea to kinds of signal the eye cannot see at all.
How it works
Two jobs: gather light, then magnify
A telescope does two separate jobs. The front lens or mirror, called the objective, gathers light. The bigger it is, the more light it collects and the fainter the things it can show. The pupil of a dark-adapted human eye is about 7 millimetres across; a 50 mm lens collects about fifty times as much light. The objective bends the incoming light so it comes together and forms a small, real, upside-down image at a point called the focal point. The distance from the lens to that point is its focal length.
The second lens, the eyepiece, sits just behind that image and acts as a magnifying glass. You are not looking at the distant object directly; you are looking, through a magnifier, at the small image the objective has made inside the tube.
Magnification
Magnification depends only on the two focal lengths:
Magnification = focal length of the objective ÷ focal length of the eyepiece
A 500 mm objective with a 20 mm eyepiece gives 25 times. Swap to a 10 mm eyepiece and it gives 50 times. More magnification is not always better. Each objective has a useful limit of roughly twice its diameter in millimetres (about 100× for a 50 mm lens); beyond that the image gets bigger but dimmer and blurrier, because the lens cannot resolve finer detail and the air is never perfectly still.
Resolution and light grasp
The finest detail a telescope can separate depends on the diameter of the objective, not on magnification. Larger diameter means finer detail and brighter images. That is why astronomers describe telescopes by their aperture (diameter) first.
Why the image is upside down
In the Keplerian design the light rays cross at the focal point, so the image is inverted. For the sky this does not matter. For use on land, an extra lens or a prism can flip it back upright; binoculars do this with prisms inside.
Refractor or reflector
A refractor uses a lens objective. It is sealed, needs little adjustment and gives crisp images, but large lenses are expensive and simple lenses show colour fringes. A reflector uses a curved mirror. It has no colour fringing and large mirrors are cheaper to make, but the mirror needs occasional alignment and cleaning. The build below is a simple refractor, because it needs no grinding and only two lenses.
Parts and what each one does
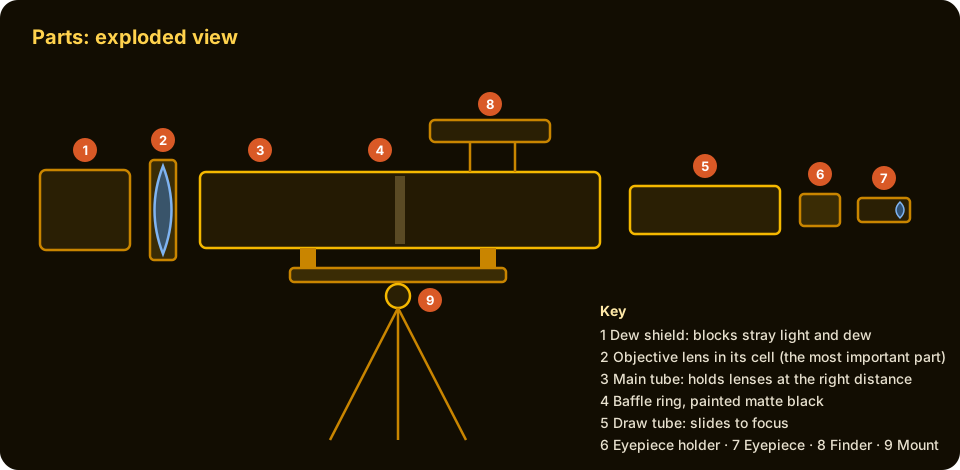
- Dew shield. A short extension of the tube in front of the objective. It blocks stray light from the side and slows dew forming on the glass on cold nights.
- Objective lens and cell. The most important part. The cell holds the lens square to the tube and centred. A tilted or loose objective spoils everything after it.
- Main tube. Holds the objective and eyepiece at the right distance and keeps out stray light. It must be stiff and straight.
- Baffle rings. Thin rings inside the tube, painted matte black, that stop light bouncing off the inner wall and washing out the image.
- Draw tube (focuser). A smaller tube that slides inside the main tube. Sliding it in and out moves the eyepiece to exactly where the image forms. This is how you focus.
- Eyepiece holder. Grips the eyepiece centred at the end of the draw tube.
- Eyepiece. A short-focal-length lens, or a small group of lenses, that magnifies the image.
- Finder. A small, low-power sight or tube mounted on top and lined up with the main telescope. At high magnification the view is tiny and finding an object without a finder is very hard.
- Mount. Tube rings and a stand or tripod. A steady mount matters as much as good glass, because any shake is magnified too.
Build it: a 25× refracting telescope
This build makes a Keplerian refractor of about 25 times magnification, enough to see craters on the Moon, the four bright moons of Jupiter and the rings of Saturn as a small oval.
Materials
- Objective: one convex lens about 40–60 mm across with a focal length of about 500 mm. A +2 diopter spectacle lens or reading-glass lens works (focal length in millimetres = 1000 ÷ diopters, so +2 D gives 500 mm). An achromatic doublet of similar size and focal length gives a sharper, colour-free image if one can be found.
- Eyepiece: one small convex lens with a focal length of about 20–25 mm, such as a strong magnifying loupe, a lens from an old camera viewfinder, or a purchased eyepiece. Shorter focal length means more magnification.
- Main tube: a stiff cardboard, plastic or metal tube slightly wider than the objective and about 450 mm long.
- Draw tube: a second tube that slides snugly inside the first, about 150–200 mm long.
- Matte black paint or black paper, card for rings, strong tape or glue, a ruler, a pencil and a craft knife.
- For the mount: a camera tripod and a clamp, or a wooden stand you can build.
Tools
Ruler or tape measure, craft knife or fine saw, scissors, glue, sandpaper, and a bright distant object for testing.
Step 1: measure each lens's focal length
On a bright day, stand indoors facing a window. Hold the lens up and move a sheet of white paper behind it until a sharp, small, upside-down image of the window or the view outside appears on the paper. The distance from the lens to the paper is its focal length. Measure it carefully for both lenses and write the numbers down; every other length comes from them.
Step 2: cut the tubes to length
The two lenses need to end up a total distance apart equal to the objective focal length plus the eyepiece focal length (here 500 + 20 = 520 mm). Cut the main tube to about 430 mm. Cut the draw tube to about 180 mm. When the draw tube is pushed most of the way in, the total length is shorter than 520 mm; pulled out, it is longer. Focusing happens somewhere in that range.
Step 3: blacken the inside
Paint the inside of both tubes matte black, or line them with black paper. Shiny walls reflect stray light and make the image hazy. Cut two or three card rings with a hole a little bigger than the light cone at that point, blacken them and glue them inside the main tube as baffles.
Step 4: mount the objective
Cut two card rings that fit snugly inside the front of the main tube, with a hole slightly smaller than the lens. Glue one ring in place, set the lens against it, and glue the second ring behind the lens so it is held squarely. If using an achromatic doublet, keep the side that is more strongly curved facing the sky. Make sure the lens sits square, not tilted.
Step 5: mount the eyepiece
Fix the eyepiece lens in the outer end of the draw tube the same way, with card rings, or build a short holder if using a ready-made eyepiece. Keep it centred.
Step 6: fit the draw tube
Slide the draw tube into the back of the main tube. It should move smoothly but stay put when you let go. If it is loose, wrap a layer or two of paper or felt around it.
Step 7: add a dew shield and finder
Glue or tape a short extra tube, about 80–100 mm long, to the front as a dew shield. For a simple finder, fix two small card rings with aligned holes along the top of the tube, like the sights on a rifle; later you can line them up with what the telescope sees.
Step 8: mount it steadily
Strap the tube to a camera tripod with two padded clamps or rings near its balance point, or build a simple wooden fork mount that lets it tilt up and down and turn side to side. Shake is the most common reason a home-made telescope disappoints.
First light: test and adjust
- Daytime first. Point the telescope at a distant building, tree or hill at least a few hundred metres away, never anywhere near the Sun. Slide the draw tube in and out until the view snaps sharp. The image will be upside down; that is normal for this design.
- Line up the finder. With a distant object centred in the telescope, adjust the finder sights until they point at the same object.
- The Moon. The best first target at night. Craters show most clearly along the line between light and dark, where shadows are long.
- Planets. Jupiter shows as a small disc with up to four tiny moons in a line beside it; they move from night to night, just as Galileo recorded. Saturn shows its ring as a small oval.
- Troubleshooting. A blurry image that never sharpens means the draw tube cannot reach the focus: adjust the tube lengths. Coloured fringes come from a single simple lens: a smaller hole in front of the objective (a stop) reduces them at the cost of brightness. A dim, washed-out view usually means stray light: add baffles and blacken the inside.
Safety
- Never point a telescope, finder or binoculars at or near the Sun. Even a moment can cause permanent blindness, and the lens can concentrate enough heat to start a fire. Solar viewing needs a certified solar filter that covers the whole front of the telescope, or the projection method under expert guidance.
- Supervise children whenever a telescope is set up in daylight.
- Handle lenses by their edges and keep them covered; glass edges can be sharp.
- Use cutting tools carefully, and keep a tripod's legs spread so it cannot tip over.
Where telescopes are used now
Telescopes are part of navigation (ships' spyglasses and binoculars), surveying (the theodolite and level are small telescopes with crosshairs), rifle and camera optics, microscopes (which share the same lens principles), and of course astronomy, from backyard refractors to the James Webb Space Telescope. The same rule runs through all of them: gather light with something large, bring it to a focus, and magnify that image.
Words to know
- Aperture: the diameter of the objective lens or mirror.
- Focal length: the distance from a lens or mirror to the point where it brings light to a focus.
- Objective: the main light-gathering lens or mirror.
- Eyepiece: the small lens you look through, which magnifies the image.
- Refractor / reflector: a telescope that uses a lens / a mirror as its objective.
- Achromatic lens: a two-part lens that cancels most colour fringing.
Related in the Knowledge Ark
The Knowledge Ark keeps 6,000 packages for rebuilding, from measuring and optics to records and navigation. Browse them, search by category and open any package at the Knowledge Ark. Its sister, the Culture Ark, keeps 2,000 things people should still be able to see in 2,000 years.
Where to learn more
- Museo Galileo, Florence: Galileo's telescopes and the history of early instruments.
- Royal Museums Greenwich: the history of the telescope and Newton's reflector.
- NASA: the Hubble Space Telescope and the James Webb Space Telescope mission pages.
- Any introductory optics textbook covering thin lenses, focal length and magnification.
Knowledge Ark build sheet. An Artificial Mind Hive (AMH) project. AMH is owned by Austin Little.